Good tidings, stranger! Well should you rejoice on this day… For I, Melvin, will be your learned mentor in your journey to Card Hunter mastery!
Sage Advice for Campaign Play
If you get trounced by a new set of monsters, pay attention to which of their cards gave you the most trouble, then re-equip your party to deal with them. This is the heart of Card Hunter strategy. If you always stick with the same items, or just equip the ones that appear to have the highest damage values, you are going to have a tough time defeating all the adventures.
Often a seemingly very high quality card will be relatively useless against a certain monster type. An Obliterating Bludgeon may be deadly against Orcs, but will bounce right off of a Green Jelly’s Amorphous Body armor card! Remember that you are playing against each monster’s unique deck, and bringing cards to the battle that will beat that deck is the path to victory.
Example: You are facing enemies that have a lot of armor cards which are making a mockery of your attacks.
Go to your collection and look for items containing cards that will force the enemy to discard their armor cards, or equip your characters with penetrating attack cards, that ignore armor altogether!
Keep a close watch on the enemy’s hand of cards. If a monster or monster group has just one movement card left in it’s hand, then it is not going to be able to attack you, or play a block. The fewer cards a character or monster has in it’s hand, the less dangerous it is.
Help at your fingertips
Cards in the game can be seen in further detail by right-clicking on them. This “zooms in” on the card and shows you the card at full size. Most things, including the icons on the cards themselves, can be hovered over with your mouse pointer to bring up a tooltip explanation. Handy, I think you will agree.
Now, on to the nitty-gritty of how the rules of Card Hunter work.
The order of play
The game screen
Reading the cards
Types of cards
Movement
Terrain
Attachments
How attachments affect large figures
Card Hunter Glossary
The Order of Play
When a new round begins, events occur in the following order:
1. Start of Round Effects
Before any cards are played, existing effects and those caused by cards in each player’s hand are resolved in the following order:
- In Hand: All cards in the hand of the starting player that trigger at the start of turn resolve in order of oldest to newest, followed by all cards in hand of the opponent in the same way.
- Attachments: All cards attached to characters controlled by the starting player that trigger at the start of the round resolve. These are checked from oldest to newest, followed by those attached to characters controlled by the starting player’s opponent in the same way.
- All terrain attachments that trigger at the start of the round resolve. These are checked from the bottom of the board to the top proceeding by column from left to right and then by row from bottom to top.
2. Discard expired attachments
Any attached cards that have reached the end of their duration expire and are discarded.
(See Duration counters in the Attachment explanation further down this page).
3. Draw
Both players draw cards.. Your characters will draw two cards each, while monsters and monster groups may draw different amounts. In mulitiplayer matches, all characters draw two cards each.
All characters are also given a copy of their default movement card. This default movement card does not come from, or return to the character’s deck.
4. Play Cards
The first player may play a card or choose to pass. After this, the opponent may do the same. Alternate playing a card back and forth until both players pass in succession.
5. End Card Play
When both players have passed in succession, the round ends.
Whoever passed first will play first in the next round.
6. Discard
Any characters with more than two cards remaining in their hand must discard down to two.
When both sides have completed discarding, a new round begins.
7. Count Victory Squares
If the battle is being fought on a board with Victory squares on it, points scored from them are now added to the Victory points total of the Player majority occupying them.
The Game Screen

Reading the Cards
The diagram below explains what the various colors and icons on the cards mean.
Remember, when playing the game, you can zoom in on a card by right-clicking on it. This makes it easy to hover your pointer over any part of the card to get a tooltip explanation of what it means.

Types of Card
 Attack cards
Used to do damage or other bad things. Hovering over an Attack card will highlight in red all squares that you can reach with the card. Characters that are valid targets will also be shown highlighted.
When played, you may choose which character to attack if there is a choice. If there is no choice as to valid targets, the card will select the only valid targets automatically.
Note that by default you will only target enemy characters with Attack cards. Should you wish to target your own figures you can hold down the Ctrl key while clicking on the card. (If you make a habit of this, you may wish to switch off Auto-target in the Options menu.)
Some Attack cards target squares instead of characters, for example, the Fireball card. These cards will highlight which squares can be selected as targets and which will be affected by the Attack.
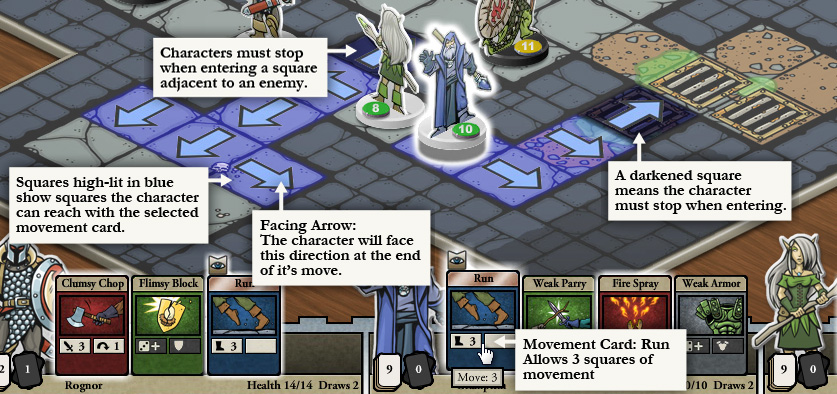
 Move cards
Allow you to move your character the designated number of squares. When you hover your pointer over or click on a move card, eligible squares you may move to will be high-lit in blue, and have a facing arrow on them. This arrow shows which way the figure will be facing at the end of the move.
Squares with a thick black border are Blocked and cannot be entered. Squares with large objects or rubble in them are difficult terrain which force your characters to stop. Likewise, moving next to an enemy character will stop your move.
Once you play a Move card it cannot be cancelled! Be certain you wish to play it.
Note: you cannot cancel move cards because playing them can trigger hidden cards from your hand or from your opponent’s hand.
 Armor cards
These cannot be played. Instead they remain in your hand until you are attacked, when they will trigger a die roll. If the die roll is greater than or equal to the die icon shown on the Armor card they will reduce the incoming damage. Most, but not all, Armor cards have the Keep keyword, which specifies that they return to your hand after triggering.
 Block cards
Like Armor, Blocks cannot be played and are triggered when a character is attacked.. The key difference between the two is that Block cards will cancel the incoming card entirely, causing it to be discarded instead of taking effect. Blocks are only triggered when enemies play cards targeting you, i.e. they will not be triggered by your allies targeting you.
Blocks are not triggered by attacks from behind the targeted character!
Blocks generally do not have the Keep keyword and are discarded after they trigger.
 Assist cards
These cards have a beneficial effect upon characters they are played on, for example, healing. Assist cards may also enhance a character’s damage output or have other helpful effects. Assist cards only target allies unless you hold down the Ctrl key when playing them.
 Utility cards
Useful cards that move your enemies around or remove harmful terrain attachments. Played at the right moment, they can drastically change the outcome of a battle, particularly when Victory Squares are in play. Utility cards target either enemies or allies as they can have effects that are good or bad depending on the context.
 Boost cards
Boost cards do helpful things to you. Some Boosts trigger when other cards are played to improve or change that card’s effects.
Other Boosts are Trait cards which MUST be played as a free action (does not count as your play) at the start of the owner’s round before any other action is taken. In most cases the player will immediately draw a replacement card.
 Handicap cards
Handicaps do bad things to you. Most Handicaps are Traits and therefore MUST be played as a free action at the start of the owning player’s round. Handicaps can have an immediate effect, but may also attach themselves to the character. Most Handicap cards cause the owner to immediately draw a replacement card.
Movement
When you left-click on, or hover over a Movement card, a preview highlight will appear on the game board. As with all cards, the preview highlight color matches the color of the card (in the case of Move cards, blue).
It will look like this:
Terrain
There are four kinds of Terrain a square may be. Remember, you can right-click on any square to see exactly what type of terrain it is if you are not sure.
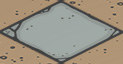 Open
Open
A normal square that you may move into. When moving, they will show a light blue highlight.
Open squares are empty-looking floor.
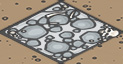 Difficult
Squares that force a character to stop when they enter. When moving, they will show a dark blue highlight.
Difficult squares look like there are objects or other impediments in them.
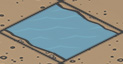 Impassable
Squares that you may not move into, but may draw line of sight through. When moving, these squares will be forbidden to move into and are not highlighted.
Impassable squares look like chasms or deep water.
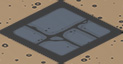 Blocked
Squares that you may not move into, nor draw line of sight through. When moving, these squares will be forbidden to move into and are not highlighted.
Blocked squares or blocking objects have a thick black border around them.
Adjacent to an enemy
A character must stop when it enters a square adjacent to an enemy. The square will have a dark blue highlight.
Attachments
Sometimes cards can have long-lasting effects, and attach themselves to characters or board squares.
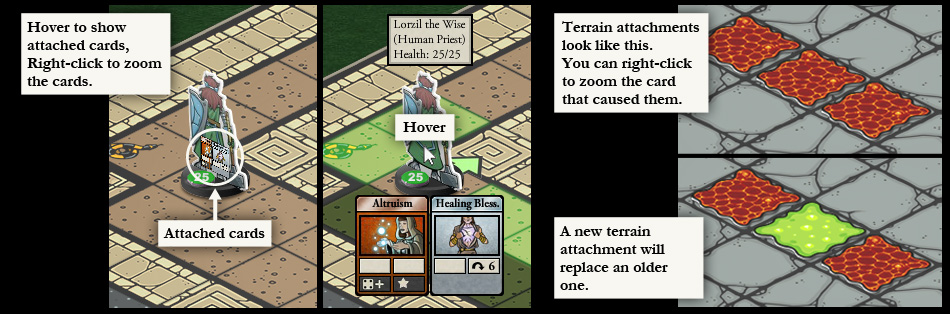
Note that each character can only have a maximum of three attachments at any one time. If a fourth card would be attached, the oldest attachment (on the left) is discarded.
Attachment duration
When you zoom in (right-click) on an attachment card, it will have a duration counter the top right corner as shown in the image below.
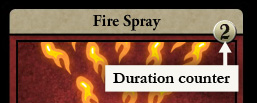
This counter indicates how many rounds the attchment will stay on the character before being discarded.
How terrain attachments affect large figures
Some large monsters in the game occupy a 2×2 square area of the game board. What happens when they are standing on multiple terrain attachment squares? They will only be affected by ONE terrain type. This is determined by counting along from the bottom square they occupy as shown below:
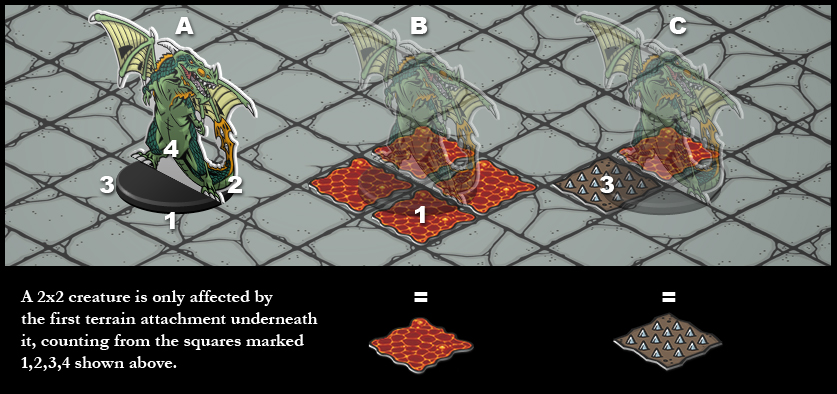
In example B, the first terrain attachment in square 1 is Lava, so that is the one that affects the Dragon.
In example C, the first square with a terrain attachment in the order shown is square 3, containing Spike terrain. In this case, it is the spike terrain that affects the Dragon.
Groups and Minions
Enemies may come in groups of more than one. Every enemy in a group is a called a minion. There are a number of special rules that apply to minions.
Minion Movement
When a group of minions plays a Move card, all the minions may move.
In the campaign game, you won’t control minions, but in Leagues or other special battles, you may control your own groups of minions. When you move your minions, the order they move in is pre-determined and you can’t control it.
Minion Actions
All other minion card plays are limited to one per minion each round. For example, each minion may only attack once per round. Once a minion takes an action, it is shaded grey and can no longer take any actions that round. However, minions may continue to move after acting.

Card Drawing
Minions draw cards and hold them as a group. The number of cards the group draws is dependent on the size of the group. Killing minions will reduce the number of cards they can draw.
Winning and Losing
Card Hunter battles are won by scoring victory stars. There are two ways to score victory stars: through killing enemies and through occupying victory squares.
Victory Stars
Killing opposing monsters or characters earns Victory stars. Most monsters are worth one, a few are worth more.
In multi-player matches, killing an opposing character will get you 2 Victory stars.
Victory Square
Sometimes a board will have glowing yellow squares on it, called Victory squares. These earn a Victory star for whichever player has the MOST characters occupying Victory squares at the end of the round.
Whichever Player/GM’s Characters are occupying the greater number of Victory squares scores a Victory star. If it is a tie, neither side scores.
Total Annihilation
If you kill all the enemies on a board you immediately win, regardless of how many victory stars you or your opponent have.
Time-out
In some battles, including ranked multi-player games, you win if your opponent runs out of time.
Card Hunter Glossary
Ally
All Characters controlled by the same Player or GM are referred to as Allies.
In a standard campaign battle, all your characters are each others Allies. Likewise all the monsters are each others Allies.
In a Multi-player match, your characters are each others Allies, and your opponents Characters are each others Allies.
Character
Each figure on the board represents a Character. You control three Characters, as does your opponent in Multi-player matches.
Each monster is a Character.
Default Movement card
In the draw phase, all Characters and Groups are given one Default Movement card. This card is dependant ont the character’s Race and does not come from their Deck.
Humans: Run (move 3)
Dwarves: Walk (move 2)
Elves: Dash (move 4)
Deck
Each Character or Group in the game goes into battle with a set of cards according to what Items it is carrying. These cards are collectively referred to as it’s Deck.
Each deck is shuffled randomly before the start of the battle, and the number of cards remaining can be seen alongside the owning Character’s portrait. When all the cards have been drawn from a Deck, it’s Discard pile is reshuffled into the Deck to replenish it.
Destroy
When a character’s default movement card is played or discarded, it does not go into the discard pile but is instead Destroyed.
This is because these “free” cards are not drawn from the Deck and therefore are not returned to it when used.
Discard
When a card finishes resolving, is blocked, or nominated at the end of the turn when discarding down to 2 cards, it is Discarded.
It goes into the owning character’s Discard Pile (which can be seen next to it’s deck pile).
GM
Game Master. Refers to a (fictional) person who controls the enemies and the events in the campaign game.
Group
A group is any number or Characters that share the same Hand.
Monsters in a group of more than one are called Minions.
Hand
Each Character or group has a Hand of cards that is hidden from the opponent and used to play cards from, just like in a traditional card game like Poker.
Minion
A monster that forms part of a multi-monster Group. Minions can only play one non-move Card per round. Once they have done so, they turn grey.
Player
A person playing Card Hunter.